Custom die cut stickers are a popular choice for businesses, artists, and hobbyists looking to add a unique touch to their projects. These stickers are precisely cut to the shape of your design, allowing for endless creative possibilities. In this blog, we'll explore the many benefits of custom die cut stickers, how they are made, and how you can design your own to enhance your brand, artwork, or personal items.
What Are Custom Die Cut Stickers?
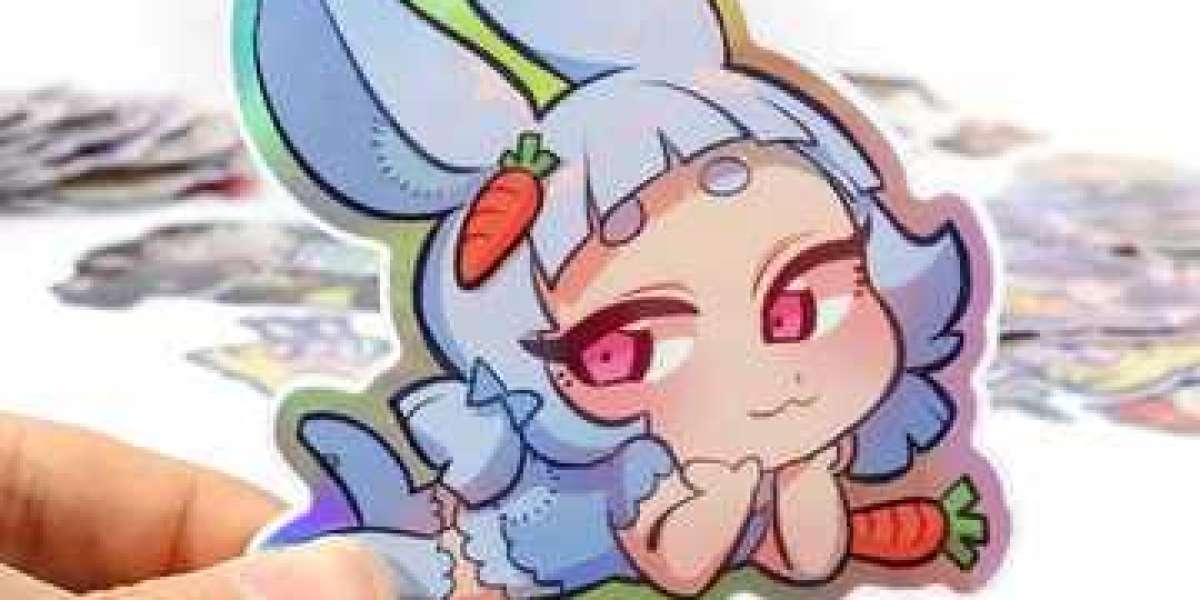
Custom die cut stickers are stickers that are cut to the exact shape of your design, rather than being confined to a standard shape like a square or circle. This precise cutting process, known as die cutting, allows for intricate and detailed designs that can make your stickers stand out. The result is a sticker that perfectly follows the contours of your artwork or logo, creating a professional and polished look.
Benefits of Custom Die Cut Stickers
Custom die cut stickers offer several advantages that make them a favorite choice for various applications:
Unique and Eye-Catching: The custom shape of die cut stickers makes them more visually appealing and memorable compared to standard shapes. They can easily grab attention and stand out in any setting.
Versatility: These stickers can be used on a wide range of surfaces, including laptops, water bottles, car windows, packaging, and more. Their unique shapes make them versatile for different uses and settings.
Professional Appearance: Custom die cut stickers provide a clean and professional look, making them ideal for branding and promotional purposes. The precise cutting enhances the overall presentation of your design.
Durability: High-quality die cut stickers are typically made from durable materials that are resistant to water, UV light, and scratches. This ensures they maintain their appearance over time, even in outdoor or high-usage environments.
Creative Freedom: Die cutting allows for creative freedom in your designs. You can create intricate shapes, detailed outlines, and unique patterns that wouldn't be possible with standard sticker shapes.
How Are Custom Die Cut Stickers Made?
The process of making custom die cut stickers involves several key steps:
Design Creation: Start by creating a high-resolution digital design. Ensure your artwork is clear and detailed, as this will affect the final quality of the sticker. Vector files (such as AI, EPS, or SVG) are often preferred for their scalability and precision.
Cut Line Preparation: Create a cut line that outlines the shape of your sticker. This cut line tells the cutting machine where to cut. It should be a separate layer in your design file and is usually marked with a specific color or stroke.
Material Selection: Choose the material for your stickers. Common options include vinyl, which is durable and weather-resistant, and paper, which is more suitable for indoor use or temporary applications.
Printing: Your design is printed onto the chosen material using high-quality printing techniques to ensure vibrant colors and sharp details.
Die Cutting: The printed stickers are then fed into a die cutting machine. This machine uses a sharp blade or laser to precisely cut along the cut line, creating the custom shape.
Weeding and Finishing: After cutting, the excess material (known as weeding) is removed, leaving only the die cut stickers. The stickers are then finished with a protective laminate if needed, enhancing their durability.
How to Design Custom Die Cut Stickers
Designing your own custom die cut stickers is an exciting process that allows you to express your creativity. Here are some steps to guide you:
Conceptualize Your Design: Start with a clear idea of what you want your sticker to look like. Consider the shape, size, and elements you want to include. Sketch out your design or use graphic design software to create a digital version.
Choose the Shape: Think about how the shape of your sticker will complement your design. The shape should enhance the visual appeal and functionality of the sticker. For example, a logo with a unique outline can be made into a die cut sticker that follows its contours.
Create the Cut Line: In your design file, create a separate layer for the cut line. This line should outline the exact shape of your sticker. Ensure the cut line is smooth and doesn’t have any sharp corners that could cause issues during cutting.
Prepare the Design File: Ensure your design is high-resolution (at least 300 DPI) to maintain clarity and detail. Save your file in a format suitable for printing, such as AI, EPS, or PDF. Include the cut line as a separate layer or color.
Find a Reliable Printer: Look for a reputable printing company that specializes in custom die cut stickers. Check their customization options, pricing, and reviews. Many companies offer online design tools and templates to help you visualize your final product.
Review and Order: Before placing your order, review your design carefully. Check for any errors or adjustments needed. Once you are satisfied, place your order and wait for your custom die cut stickers to arrive.
Uses of Custom Die Cut Stickers
Custom die cut stickers can be used in various contexts to add a unique touch and enhance visibility:
Branding and Marketing: Businesses can use custom die cut stickers for product packaging, promotional giveaways, and brand reinforcement. The unique shapes help create a memorable impression.
Art and Design: Artists and designers can use die cut stickers to showcase their artwork. These stickers can be sold as merchandise or used to promote their work.
Events and Festivals: Custom die cut stickers are great for events. They can be used as tickets, souvenirs, or part of event branding.
Personal Items: Individuals can personalize their belongings, such as laptops, water bottles, and phone cases, with custom die cut stickers. This adds a personal touch and makes items easily identifiable.
Educational and Informational: Schools, universities, and organizations can use die cut stickers for educational purposes or to provide important information in a visually appealing way.
Caring for Your Custom Die Cut Stickers
To ensure your custom die cut stickers remain in good condition and maintain their appearance, follow these care tips:
Clean the Surface: Before applying your sticker, make sure the surface is clean and dry. This ensures the sticker adheres properly and lasts longer.
Apply Even Pressure: When placing the sticker, apply even pressure to avoid air bubbles. You can use a flat object, like a credit card, to smooth out the sticker.
Avoid Harsh Conditions: While custom die cut stickers are durable, extreme conditions like direct sunlight for extended periods or heavy moisture can affect their appearance. Place them in areas where they won't be exposed to harsh elements.
Proper Removal: If you need to remove a sticker, peel it off slowly and gently to avoid leaving residue or damaging the surface.
Conclusion
Custom die cut stickers offer a unique and creative way to enhance your brand, artwork, or personal items. Their precise and intricate shapes make them stand out, and their versatility allows for a wide range of applications. By following the steps and tips outlined above, you can design and create custom die cut stickers that not only meet your needs but also leave a lasting impression. Start exploring the world of custom die cut stickers today and unlock new possibilities for your projects!